I wouldn't say the second flower in the new Wilton Course 4 Advanced Gum Paste Flowers is all that realistic, but then again, gerbera daisies don't always look all that realistic! Even growing out of the ground, there's a sort of pop-art sameness about them, which is very conducive to gum paste reproduction. I couldn't help myself when someone looked in on the class and asked, "What is this a class in?" I answered, "Play-Doh." Read on for how to make this whimsical bloom. The tools needed include a gum paste storage mat to use for a work surface, a 9" fondant roller fitted with purple rings, a small container of gum glue adhesive (made from a pinch of gum paste dissolved in a tablespoon of water), an angled brush, a 4" flower forming cup (which I can't find anywhere so had to settle on a 3" one or a similarly sized dish), a dusting pouch filled with a 50/50 mix of cornstarch and powdered sugar, a piece of purple shaping foam, a few tools from the Wilton 10-piece Gum Paste Tool Set (the large ball tool, the large veining tool, the modeling sticks, and the palette knife), and a few items from the student kit for Course 4 (the impression mat, and the large and small daisy cutters). You'll also need a gumball-sized piece of yellow gum paste, and a golf ball-sized piece of pink gum paste (or whatever color you like; also, in class we've been using a 50/50 blend of fondant and gum paste to allow us more time to work before it dries out; always keep it in a baggie or under a plastic cup until you're ready to use it).
Start by dusting your work surface with the dusting pouch:Roll out the pink gum paste…
…and press down firmly with the large cutter:
You might even want to roll over it a few times with your fondant roller; really press it down:
When you pick the gum paste up, the cutter should almost be poking through.
Tear away the excess, roll it up and keep it stored in a baggie or under a plastic cup. It can be re-rolled to make the other pieces.
Remove any small scraps by drawing your finger down the edge of each petal toward the center:
Use the rounded base of the large modeling stick to convince the flower to release itself from the cutter:
Here it is, in hand. My first reaction to it is it felt like some sort of sea anemone or exotic aquatic plant:
Lightly dust the purple foam, and center the cutout on it:
Draw the large end of the ball tool out from the base of each petal until just before the tapered tip; this will elongate the petals. In this photo, I've only done this to the petals on the right:
It feels like I'm going to tear them off every time, but that hasn't happened yet.
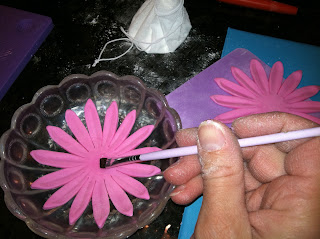
Using the wide end of the veining tool, draw the flat side of that tool toward the middle of the cutout from just inside the tip; stop when you reach the base:
Allow the flower to dry in a 4" flower forming cup (if you have one), or in an appropriately-sized bowl. If you allow it to dry on a 3" flower forming cup, it will definitely be more concave.
Make a second flower, exactly like this one. Use your brush to dab some gum glue adhesive in the center of the first flower…
…and then position the second flower on top of it. Be sure the petals aren't stacked on top of each other; rotate the top flower over half a petal so all of the petals' tips are showing:
Then cut out one flower with the small daisy cutter:The steps are mostly the same except for I found it easiest to remove the flower from the cutter with the palette knife, which I gently slid in between the cutter and the edge of the gum paste on every petal:
After doing all the same steps with the ball and veining tools as you did on the large cutouts, dab a little more gum glue adhesive to the center of the large flowers and position this cutout on top of them:
Now it's time to make the center. Dust the gerbera center mold on the impression mat, and press the yellow ball of gum paste into it:
Tamp it down well. If it's too big, pinch a bit off, re-roll it and start over.
Attach it to the center with your gum glue adhesive. You're done!
The book given out in the class comes with all sorts of great ideas for these daisies; everything from cupcake toppers to napkin rings! Not exactly sure how, but I'm going to figure out a way to do like the song says and go to San Francisco with some flowers in my hair.


No comments:
Post a Comment